Step-by-Step Guide to Setting Up and Selling Event Tickets
Do you have an event coming up?
Are you wondering how to create, manage, and sell tickets without stress?
Are you wondering how to create, manage, and sell tickets without stress?
We know that organizing events can be time-consuming, from setting up registration to managing payments and keeping track of attendees.
On Mainstack, Event Ticket is a simple, all-in-one tool that helps you create and sell tickets and manage attendees directly from your Mainstack dashboard.
Whether you’re organizing a physical event or an online session, you can set up, track and manage everything directly from your Mainstack dashboard with no third-party platform needed.
This ticketing solution is perfect for creators, entrepreneurs, and organizations hosting workshops, webinars, live shows, or conferences and want to simplify registration and payment.
Ready to Create and Sell Your Tickets? Get started here. It takes 5 mins
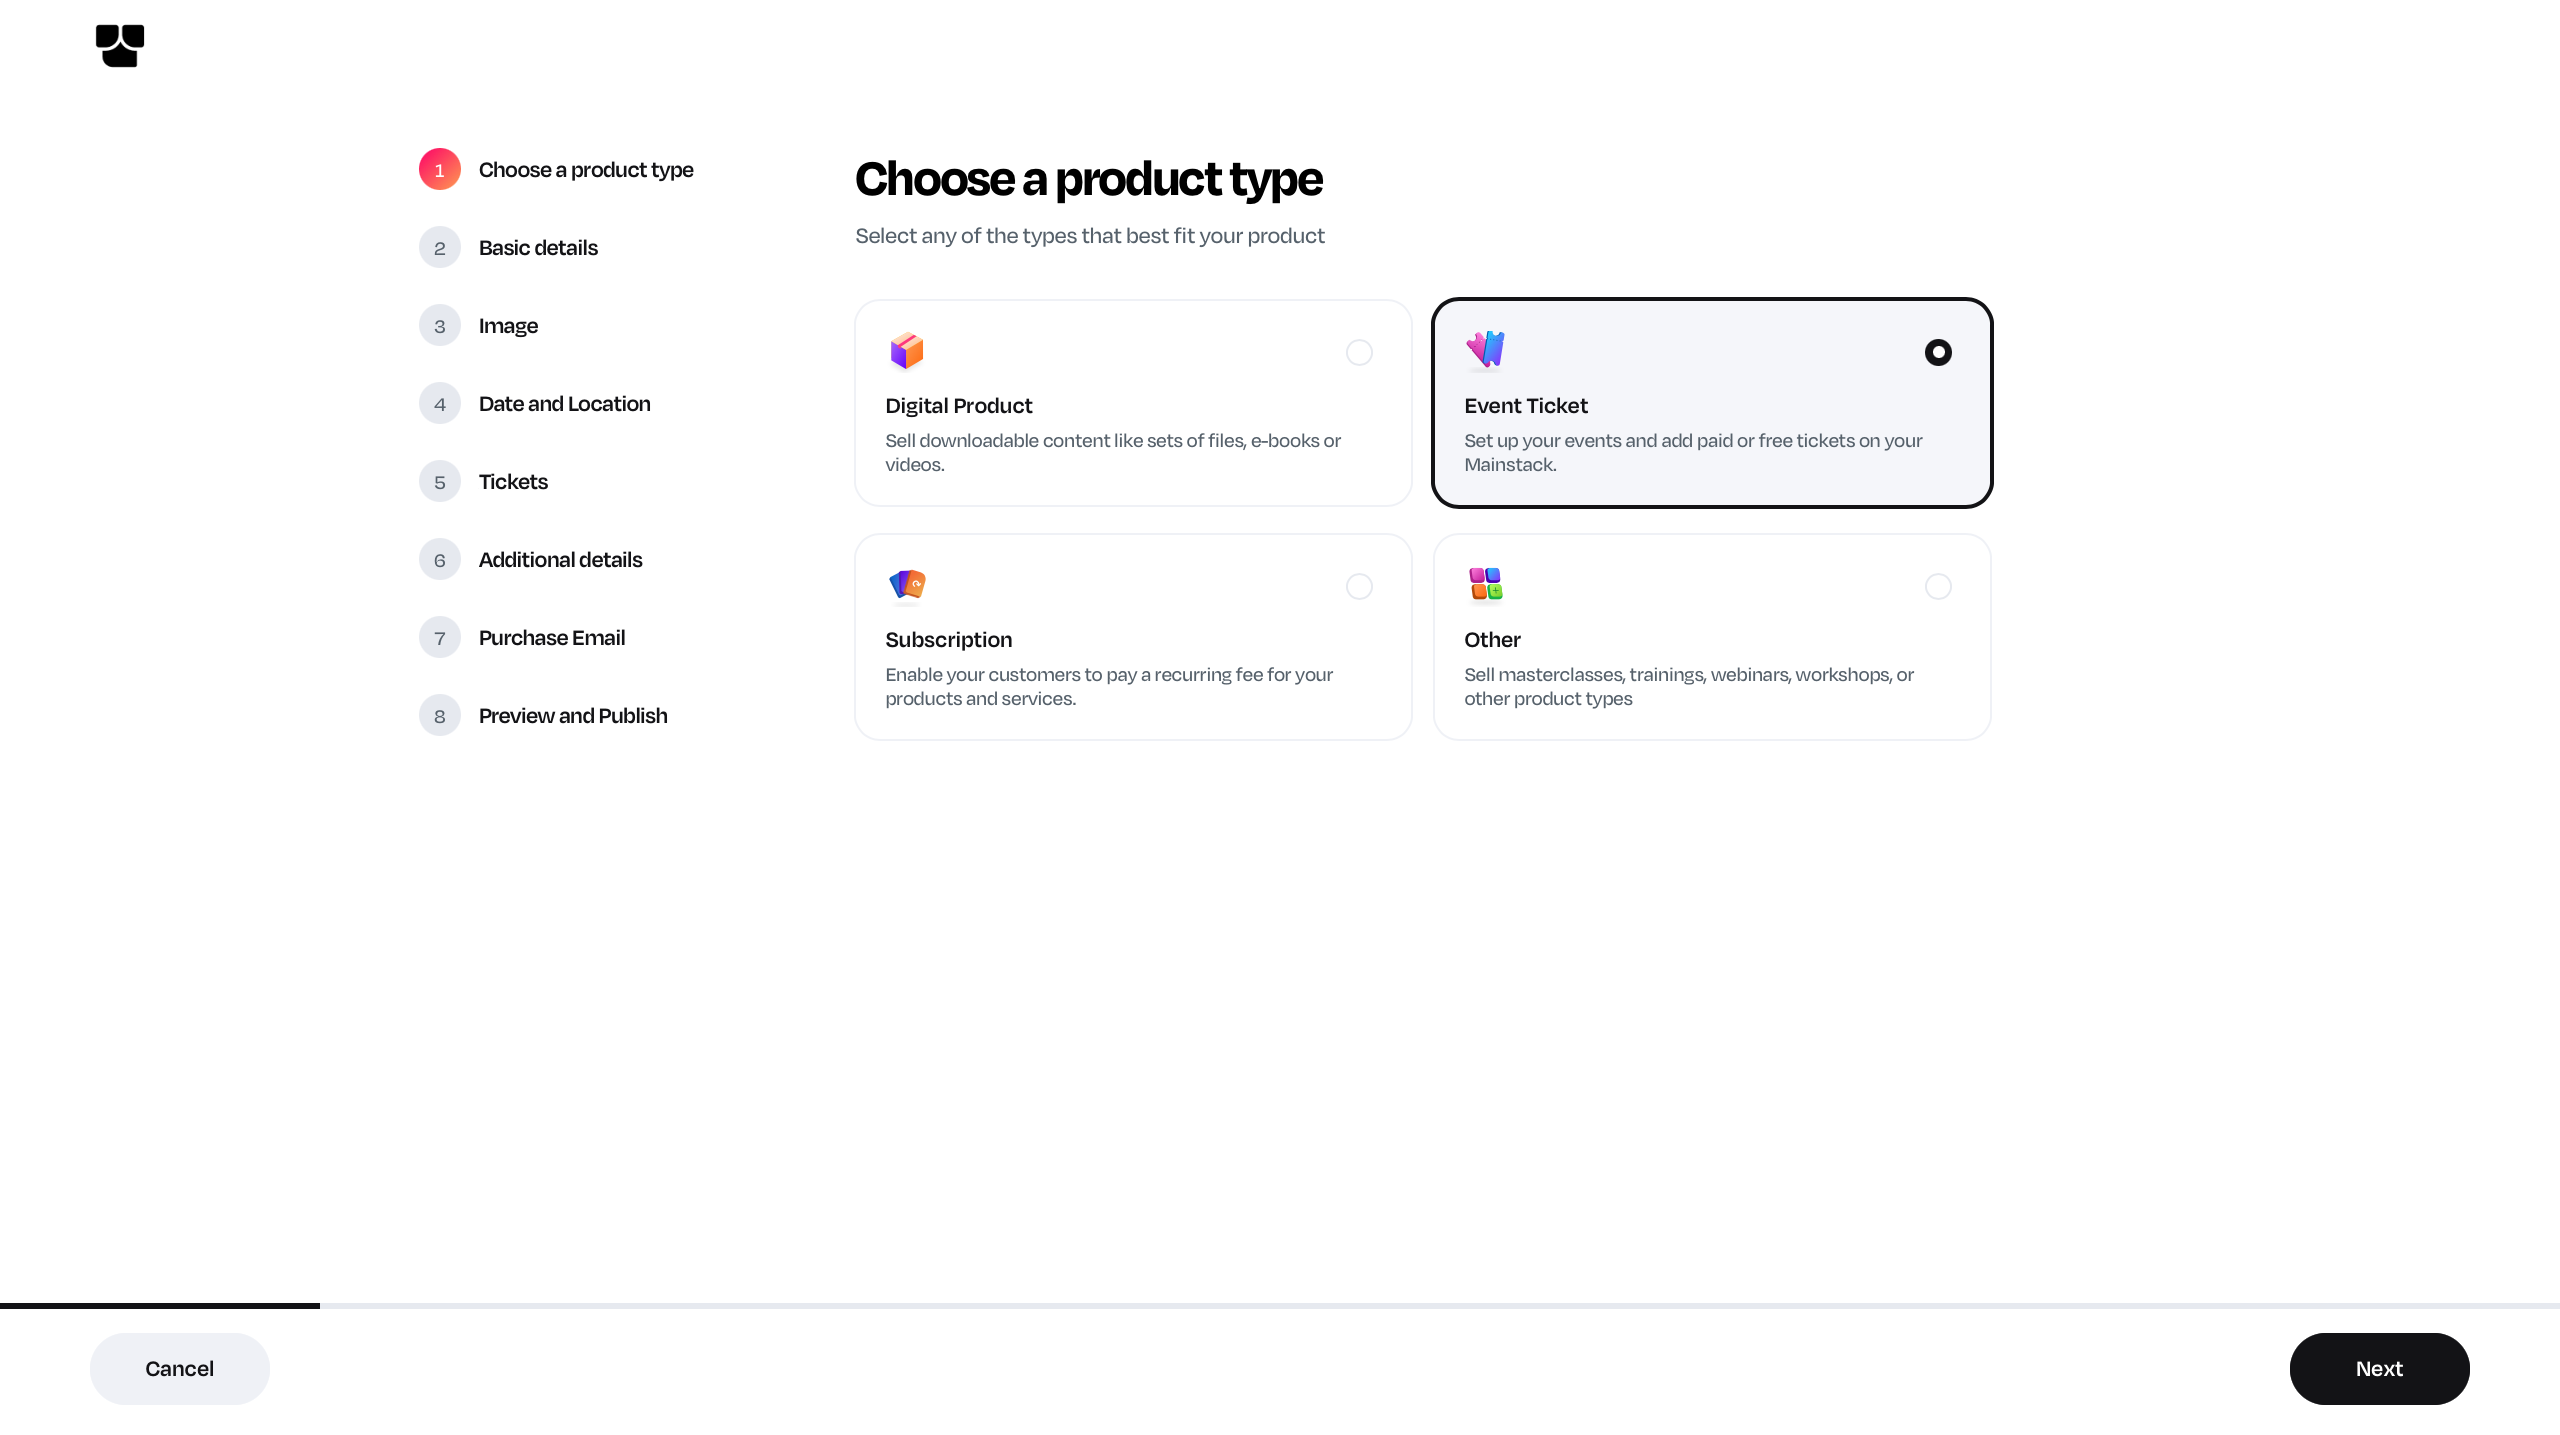
How to Create an Event Ticket
Step 1: Visit Your Dashboard
- Log in to your Mainstack dashboard.
- Click Storefront
- Click the “+Add Product with AI” button.
- From the available product types, select Event Ticket.
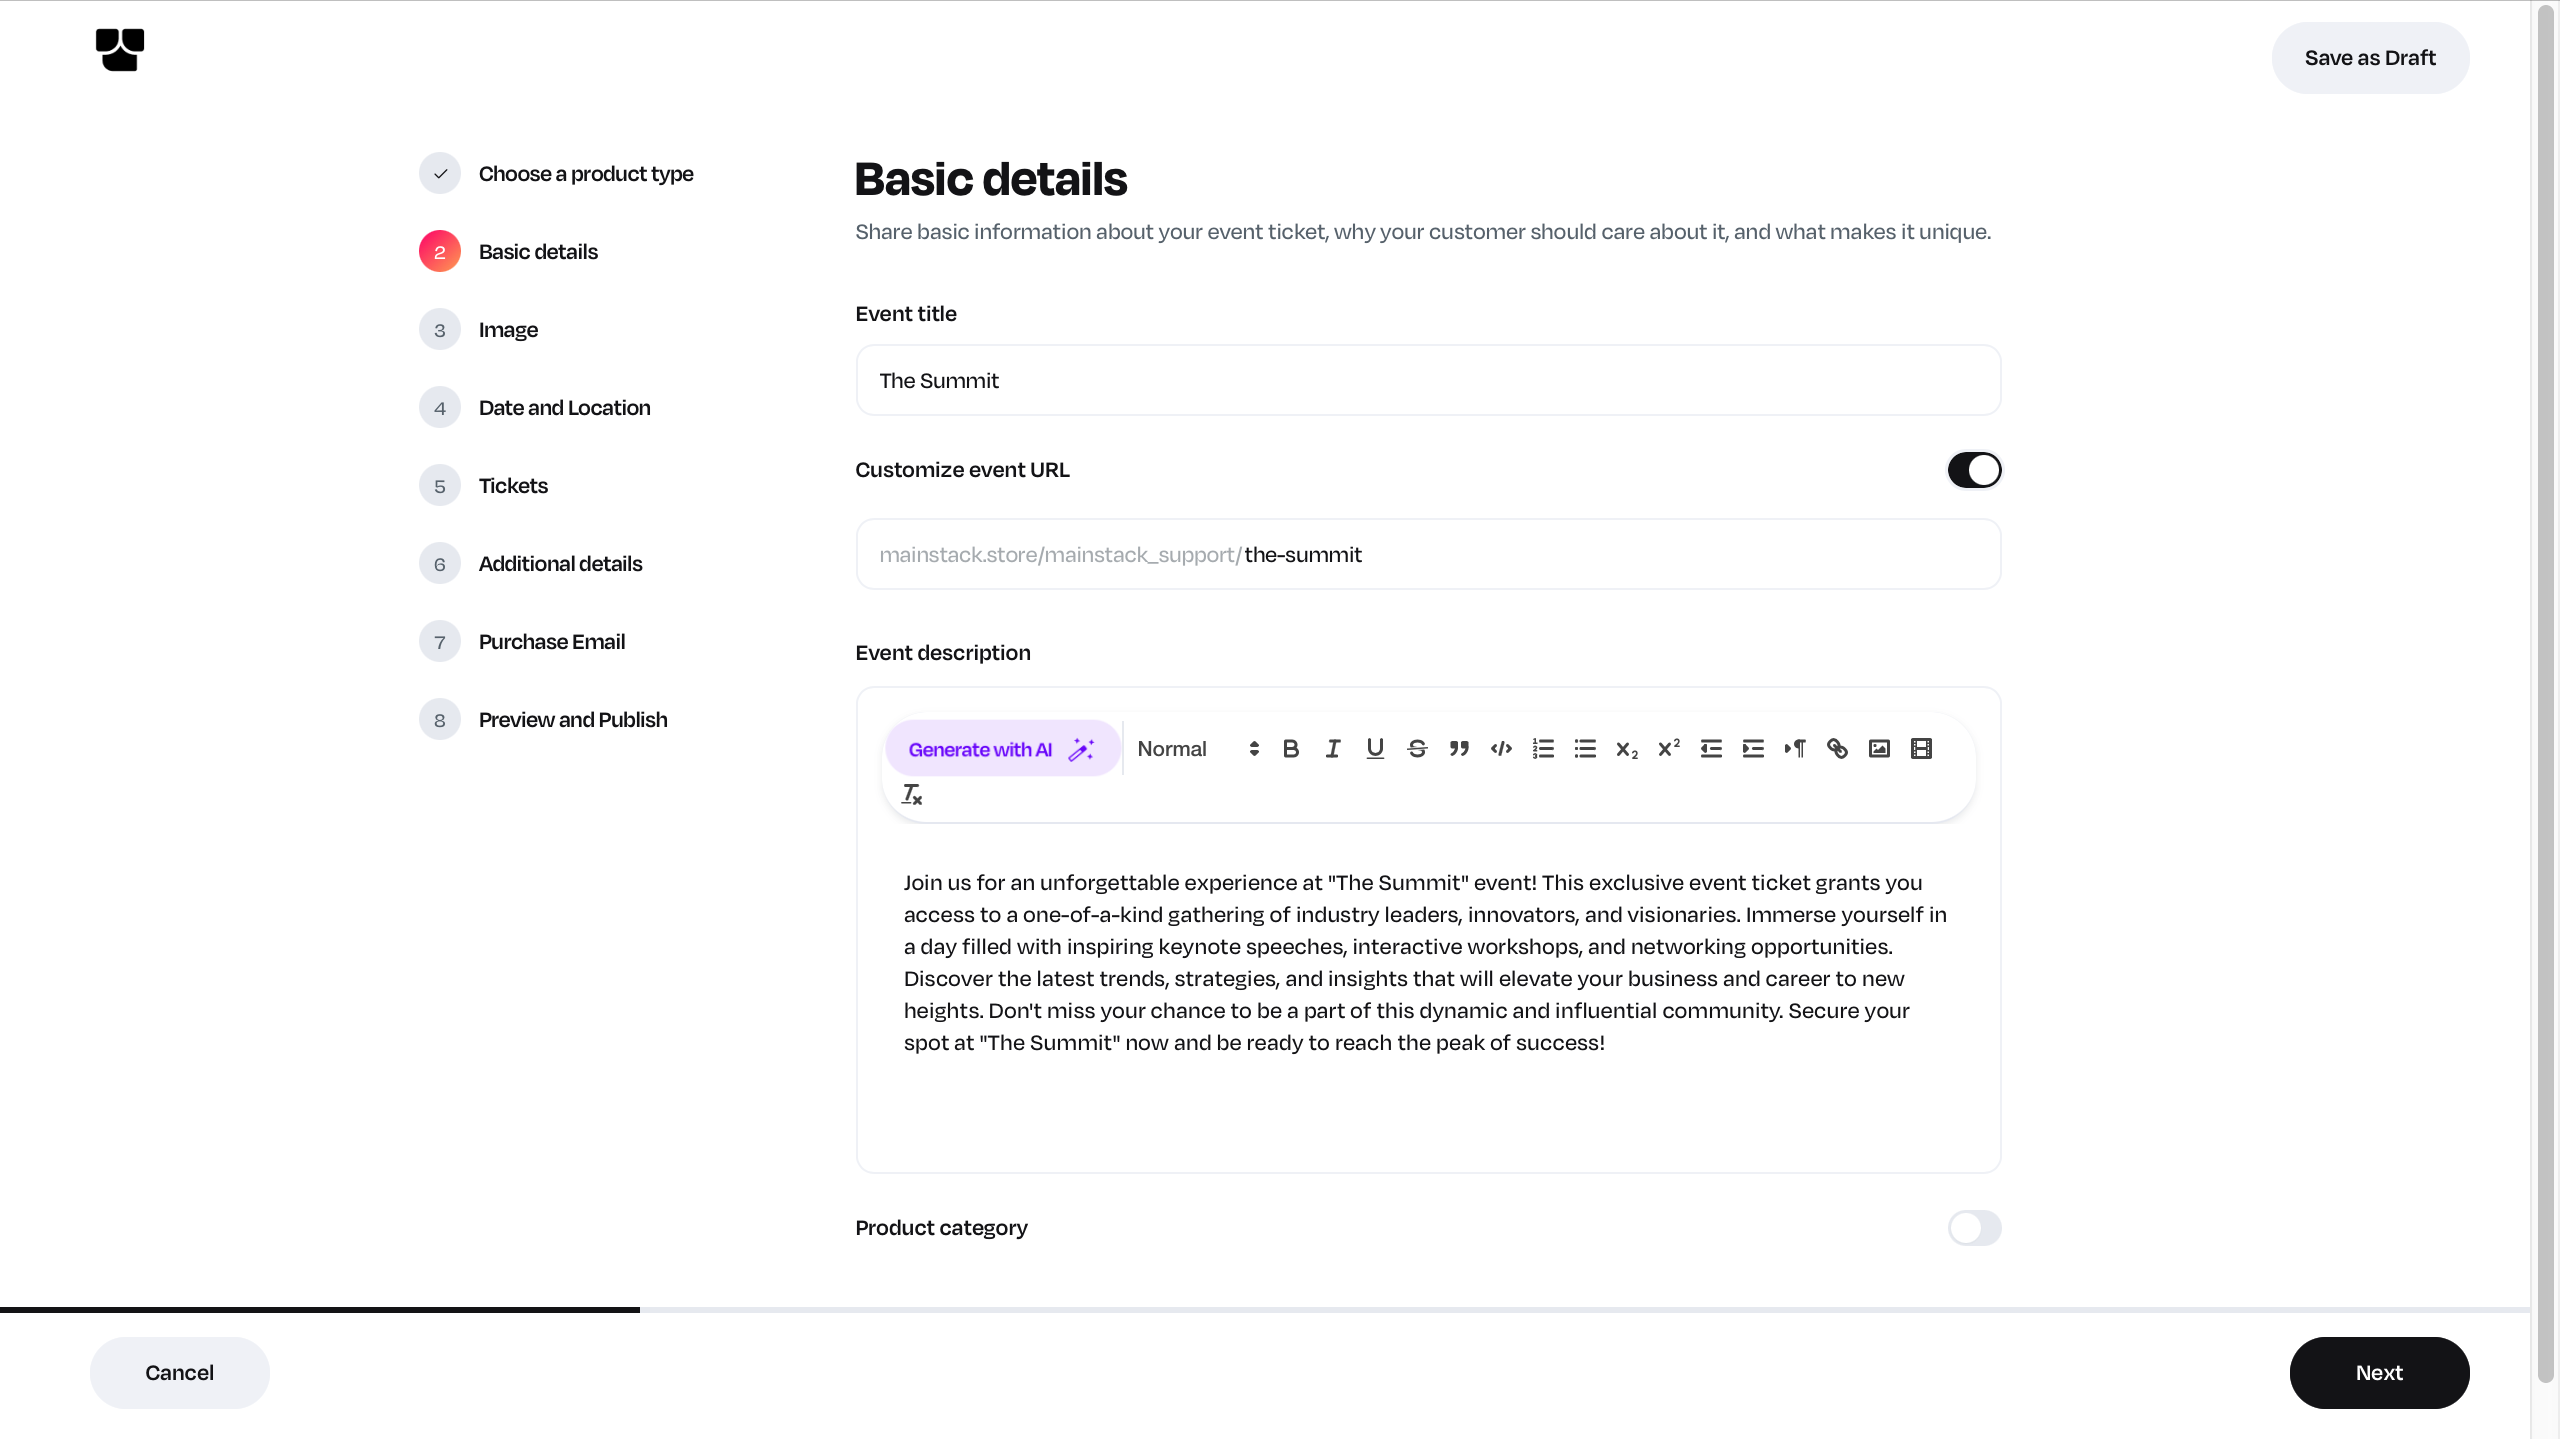
Step 2: Enter the Event Details
You’ll be prompted to fill in the key details about your event:
- The event title
- A short summary about your event, after providing this information,
- Click Next to proceed.
Step 3: Upload Your Event Flyer
Upload a flyer or poster for your event. This will appear on the ticket page and help attract more buyers.
 Tip: Use a high-quality image because it’s the first thing attendees notice.
Step 4: Set the Time Zone, Date, and Time
- Set your event start date and time.
- Set the end date and time.
- Ensure the correct time zone is selected to avoid confusion.
 Important: Always double-check your time zone before publishing.
Step 5: Choose the Event Location
- If it’s a physical event, enter the event location (venue, city, country).
- For online events, provide the meeting or streaming link (e.g. Zoom, Google Meet, etc.).
- If you do not have a location yet, you can select “To be announced”.
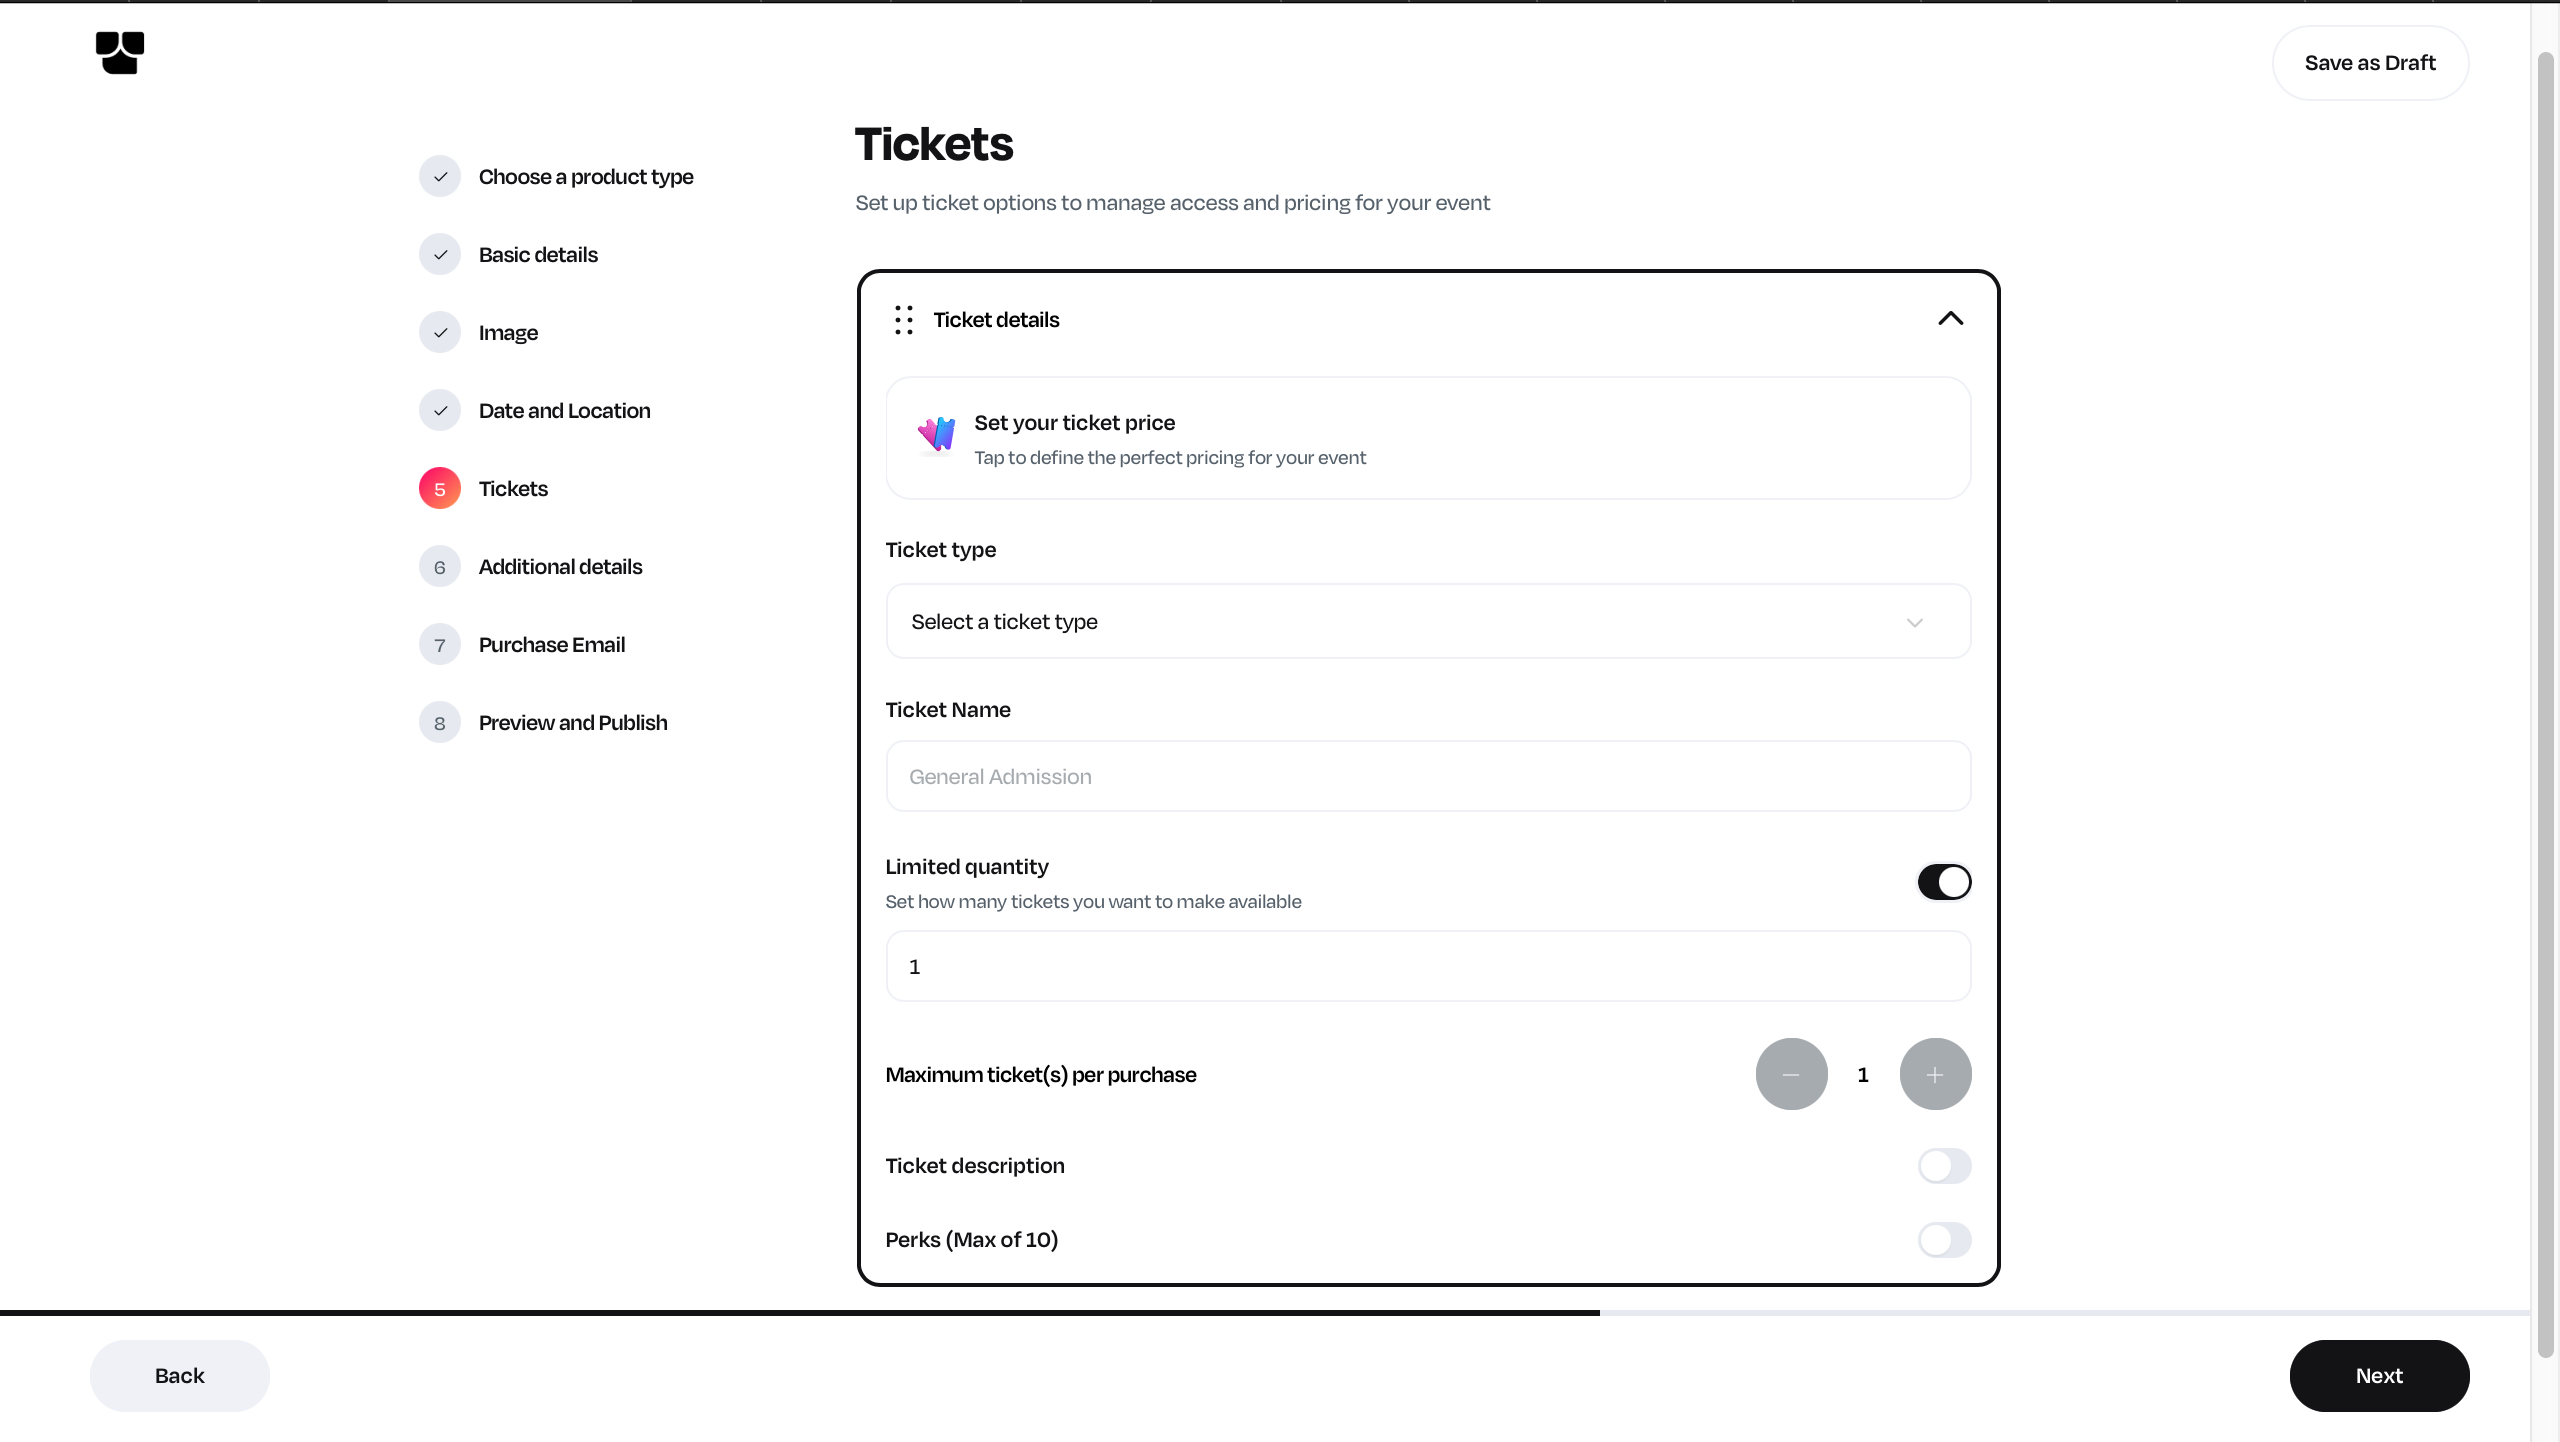
Step 6: Set up your Tickets
This section allows you to define how your tickets will be structured.
a. Pricing
- Set the ticket price; it can be free or paid.
- You can use the one-time or fast-action pricing model
The fast-action pricing model can be used to set early-bird ticket purchases to encourage faster sales.
b. Select the Ticket Type
We have two ticket types you can choose;
- Single Ticket: This ticket type is valid for one attendee only.
- Group Ticket: This allows multiple attendees under a single purchase.
c. Ticket Quantity
- Enter the number of tickets available for sale.
This helps manage limited slots or capacity-based events.
d. Maximum Ticket per purchase
- Set the number of tickets that can be purchased at a time
This helps to give your attendees the flexibility of purchasing multiple tickets
e. Ticket Description (this is optional)
- Add additional details about the ticket (e.g., benefits, seat category, inclusions).
f. Add Ticket Perks (this is optional)
- Highlight the key benefits for that ticket type.
To create multiple ticket options (like Regular, VIP, Student, etc.), click “Add More Tickets.”
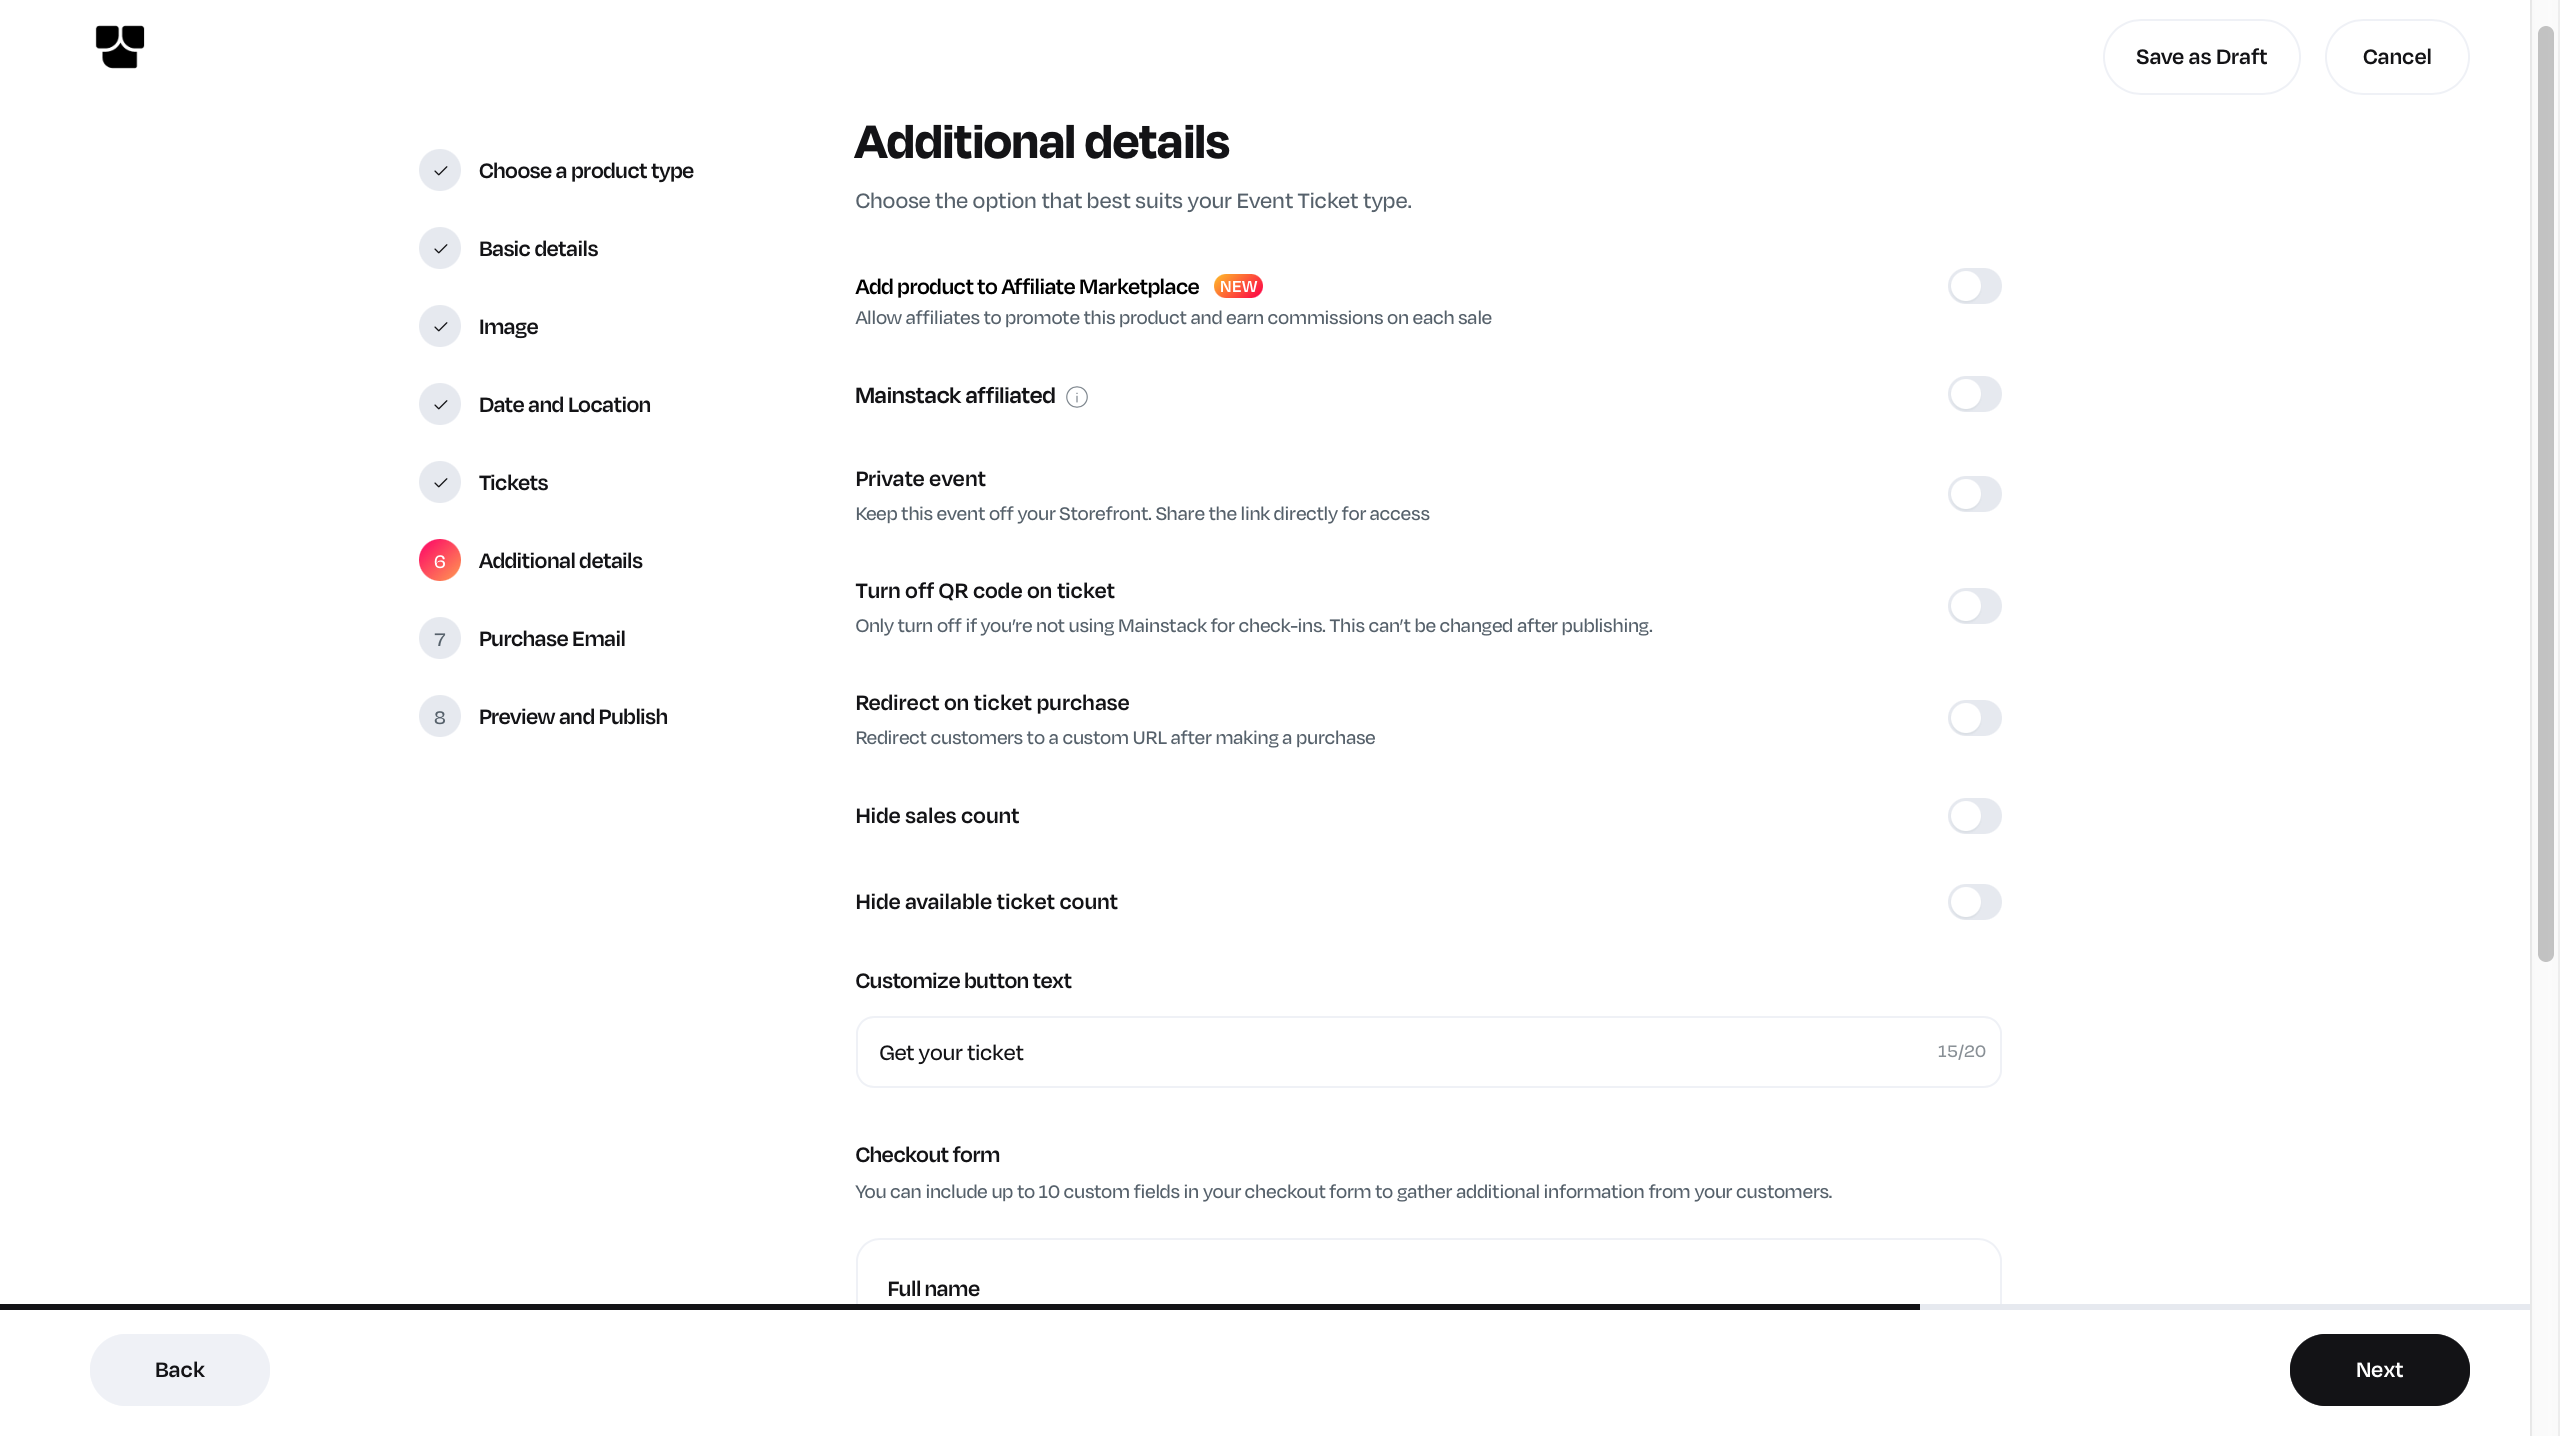
Step 7: Configure other ticket settings
On this page, you can collect additional information on the checkout form, hide your sales count or number of available tickets, customize your purchase confirmation email, and so much more.
Step 8: Review and Publish
Once you’ve filled in all required details:
- Review your event summary, and
- Click Publish to make your event live.
Your event ticket is ready! 🎉
Share it with your audience by copying the event URL and posting it on your socials, or embed it right on your website for easy access.
To integrate your event ticket to your website or event sales page, follow this guide.
Analytics, Sales Tracking and Managing Attendees
- Monitor Ticket Sales and Analytics
Track the performance of your event directly from your dashboard:
- View the total number of tickets sold.
- Track and monitor sales performance and total revenue earned.
Tip: Use these insights to adjust pricing or promote underperforming ticket tiers.
- Manage Guest List and Check-Ins
Guest Management
- View and track all registered attendees in real time.
- Export your guest list for offline use or event coordination.
- Add guests manually if they register through another channel.
Check-In Options
- Check guests in directly from your dashboard.
- Or use the QR Web Scan tool to verify tickets on arrival — ensuring quick and secure access.
Tip: The web scan feature works seamlessly on desktop or mobile browsers for on-the-go verification.
- Send Emails to Guests (Pre- and Post-Event)
Keep your guests informed and engaged using Mainstack’s Email Marketing Tool.
You can:
- Send pre-event reminders or important updates (e.g. event link, dress code, location change).
- Send post-event follow-ups, thank-you messages, or promotional offers.
Tip: Use personalized subject lines to improve engagement and open rates.
FAQ
1. Can I change event details after publishing?
Yes, but some changes (like ticket price or type) may only apply to new purchases.
Yes, but some changes (like ticket price or type) may only apply to new purchases.
2. How do attendees get their tickets?
Tickets are automatically emailed to buyers after successful payment.
Tickets are automatically emailed to buyers after successful payment.
3. What happens if I disable the QR code?
The ticket will still be valid, but attendees won’t have a scannable code for entry.
The ticket will still be valid, but attendees won’t have a scannable code for entry.
4. Can I send emails to attendees?
Yes, you can send emails before and after the events to your attendees and guests from within your dashboard at zero cost.
Yes, you can send emails before and after the events to your attendees and guests from within your dashboard at zero cost.
5. Can I create discount/coupon codes?
Yes, you can generate discount codes for your event ticket.
Yes, you can generate discount codes for your event ticket.
Related Articles
How to create Tickets
Step-by-step guide on how to create tickets. Step 1: Log in to your dashboard Step 2: Click Products Step 3: Click “+ Create product” Step 4: Select the product type “Tickets” and click Proceed Step 5: Input the event title, preferred URL, and ...How to add more tickets
Step-by-step guide on how to create more tickets. Step 1: Log in to your dashboard Step 2: Click Products Step 3: Search for the product and click it Step 4: Next, click Tickets Step 5: Click the +Add more tickets button to add more ticket types and ...How to Add Perks to Event Tickets
Log in to your Mainstack Dashboard. On the Home page, scroll to the Mainstack Apps section and click on Storefront. Click on the ‘+ Add product with AI’ button. Select Event Ticket as your preferred product type. Enter the basic information about the ...How to disable QR codes for event tickets
Log in to your Mainstack Dashboard. On the Home page, scroll to the Mainstack Apps section and click on Storefront. Click on the ‘+ Add product with AI’ button. Select Event Ticket as your preferred product type. Enter the basic information about the ...How to Add a New Ticket Category to an Event
Log in to your Mainstack Dashboard. On the Home page, scroll to the Mainstack Apps section and click on Storefront. Click on the specific Event Scroll down to the ticket section Click on Add more tickets Add the ticket details Select the ticket type, ...